
Latest Update: NSP Scholarships 2026-27 registration opening, click here for OTR.
What is One-Time Registration (OTR) on NSP?
The One-Time Registration (OTR) on the National Scholarship Portal gives every student a distinct fourteen-digit identification number, linked with their Aadhaar or Aadhaar Enrolment ID. This number remains valid throughout the course of their studies and acts as a single point of identity for all scholarship needs. With it, students do not have to go through the trouble of registering afresh each year. Instead, the process becomes simpler, more reliable, and far more convenient, ensuring that their focus stays on learning rather than paperwork.
Important facts:
1. OTR is mandatory for applying to both PRE-Matric and POST-Matric SC Scholarships on NSP and will remain valid for the entire academic journey of the student.
2. Aadhaar is required to generate the OTR.
3. If a student does not have an Aadhaar number, they can generate the OTR using their EID.
- The EID is the number you get when you apply for Aadhaar and are waiting for the card.
- However, they must update their Aadhaar details within one month.

5. Only one OTR ID is permitted per student.
6. If a parent or legal guardian’s Aadhaar is used, it can be used to link a maximum of two children.
Note: If more than one OTR is found for a student, they will be disqualified from receiving scholarships.
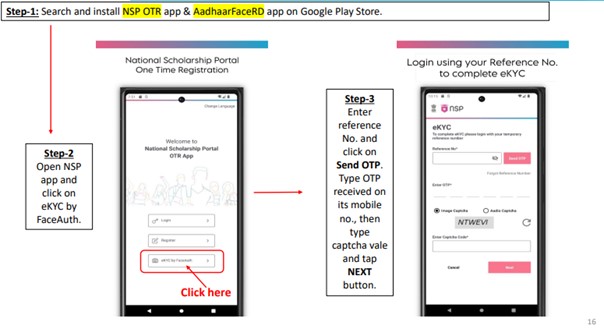
Guide On How To Generate the One-Time Registration (OTR) Number on the NSP OTR App
Here is a step-by-step guide on how to generate your OTR number on NSP through the mobile application.

Step 2: Search for the NSP OTR application in the search bar.
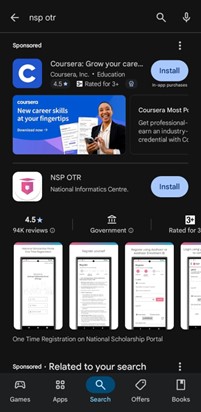
Step 3: Click on the Install button and wait for the application to get downloaded.
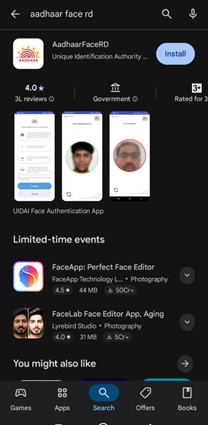
Step 4: Once the application is downloaded, search for the Aadhaar Face RD application.
Step 5: Now, click on the Install button and wait for the application to get downloaded.
Step 6: After installing both applications, open the NSP OTR application
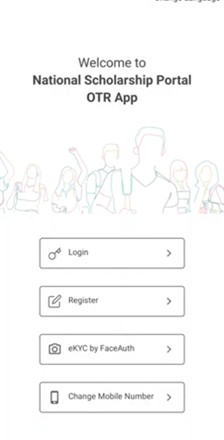
Step 7: Click on the Register button.
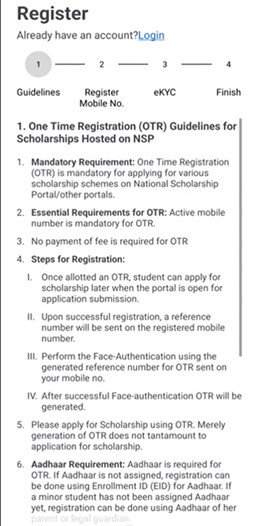
Step 8: The Guidelines page will appear. Read the Guidelines and tick on the ‘I Agree’ check boxes. Then click on the ‘Next’ button.
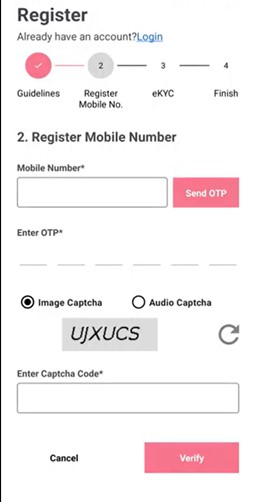
Step 9: Now, you will have to register your mobile number. To do that, enter your phone number in the box presented on the screen and then click on the send OTP button.
Step 10: Enter the OTP sent to your phone number in the box provided.
Step 11: Fill the captcha in the box and click on the ‘Verify’ button.
Step 12: Now you will be able to access the third step, which is the e-KYC process. Here, you need to select the first option ‘I have Aadhaar’.
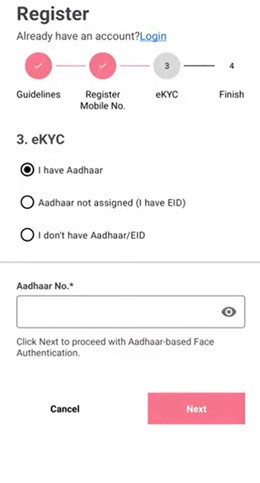
Step 13: Enter your 12-digit Aadhaar number in the box and click on the ‘Next’ button.
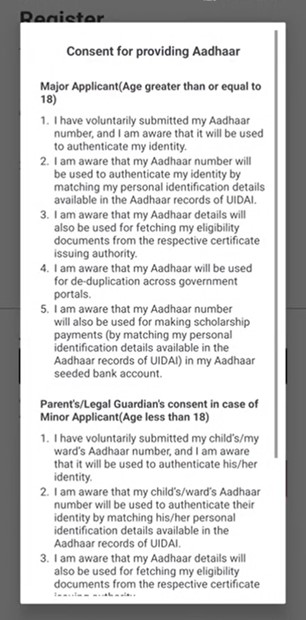
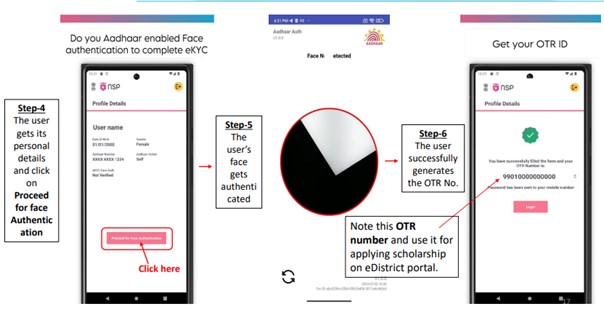
Step 14: A Consent Form will appear on your screen. Click on the ‘I Agree’ button at the end of the consent form. You will now be redirected to the Aadhaar Face RD application.
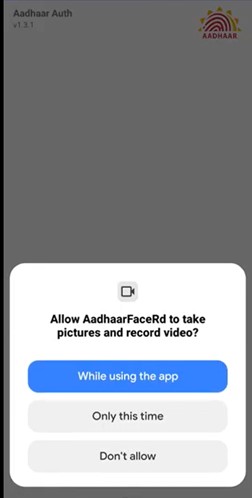
Step 15: Give permissions to the Aadhaar Face RD application to use your phone’s camera by clicking on the ‘While using the app’ option. After giving permission, the application will take some time to load into the next interface.
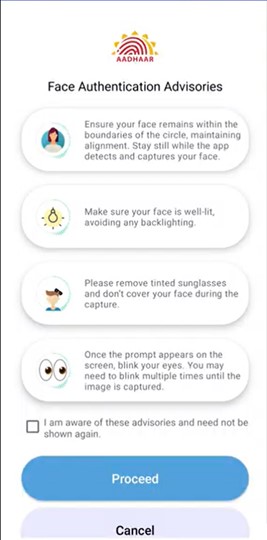
Step 16: The next interface appears for the Face Authentication Advisories. Here, you have to follow the directions mentioned and tick the checkbox to click on the Proceed button. Now, the Face Authentication screen will open.
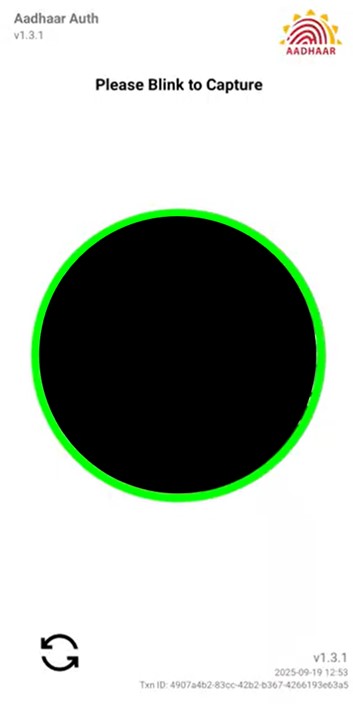
Step 17: You need to align your face with the circle and need to blink your eyes once to confirm your face ID.
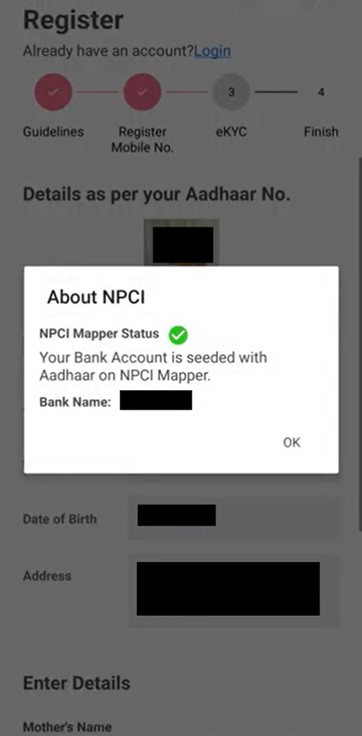
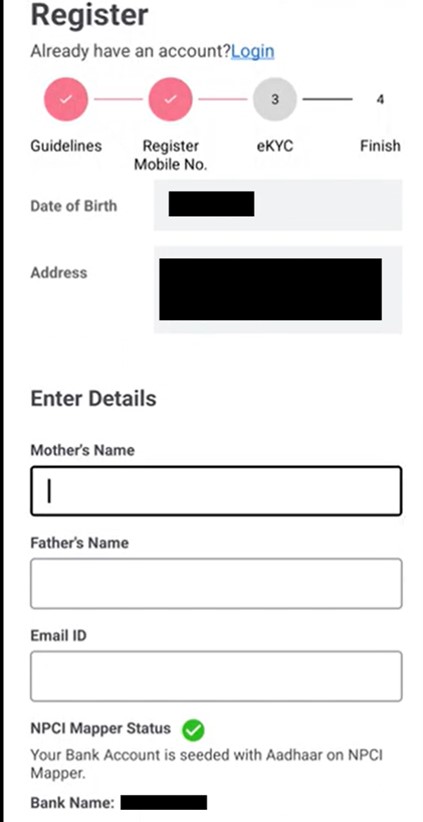
Step 18: After Face Authentication you will receive a confirmation pop-up on the application. This pop-up will show the NCPI Mapper Status stating Your bank account is seeded with Aadhaar on NCPI Mapper.
Step 19: On this screen, you will be able to see all your prefilled details mentioned through your Aadhaar. Below these details, you will have to enter your parents’ names and your email address.
Step 20: Once done, you will be able to see your unique OTR number on the screen. The password will be shared through text message on your registered mobile number.
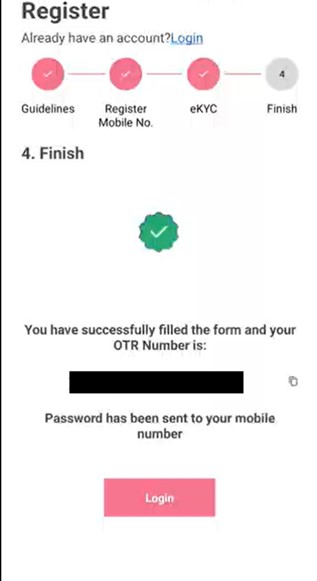
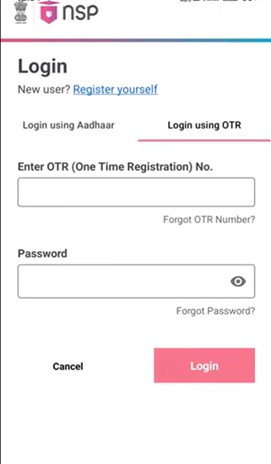
Step 21: Click on the login button. Use the OTR number and the password shared through text message to access your account on the NSP OTR app.
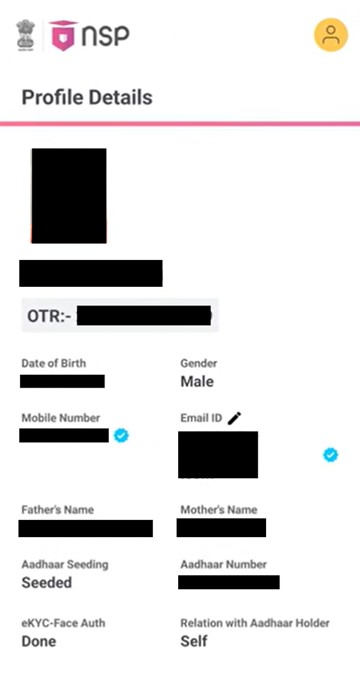
Step 22: You can now view your profile on the NSP OTR portal.
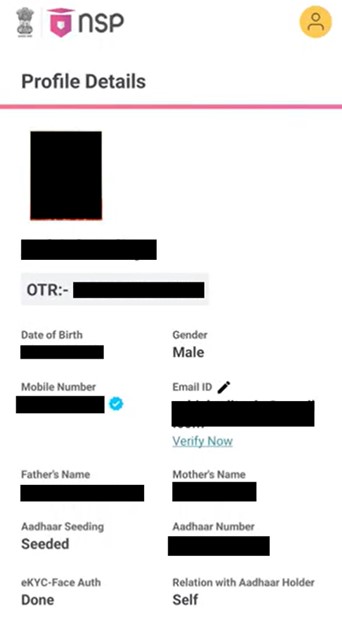
Step 23: Now, click on the ‘Verify Now’ button under the email address option to verify it.
Step 24: An OTP will be shared with you via email. Copy that and paste it here on the app to verify it.
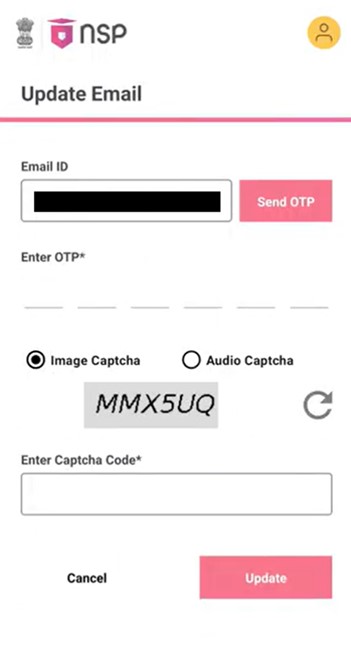
Step 25: Once done, you will get a tick mark on your email section as shown below.
OTR Generation Process at a Glance
Students can check the images below to understand the complete OTR generation process on the NSP OTR app at a glance.
Also Read: National Scholarship Portal 2026
Common Mistakes During One-Time Registration (OTR) on NSP
1. Incorrect Aadhaar Number
Providing an incorrect Aadhaar number during registration may lead to mismatches in the system, resulting in an unsuccessful OTR process.
2. Multiple OTR IDs for One Student
Generating more than one OTR for a student, whether using their own or a guardian’s Aadhaar, will lead to disqualification from scholarships.
3. Failure in Aadhaar Seeding
If the Aadhaar seeding process fails, the applicant will not be able to proceed with generating the OTR.
4. Not Agreeing to Terms and Conditions
Applicants often forget to check the box agreeing to the terms and conditions before proceeding to the next step of the OTR process, which will hamper the process.
5. Incompatible Mobile Devices
Using unsupported devices or older versions of Android can prevent the successful completion of the OTR registration process via the mobile app.
6. Using Invalid Reference Numbers
If a reference number is incorrectly entered or invalid, the registration will not be processed, causing delays in receiving the OTR.
FAQs
What is One-Time Registration (OTR) on NSP?
OTR is a unique 14-digit identification number linked to a student’s Aadhaar or Aadhaar Enrolment ID (EID). It is valid throughout the student's academic journey and simplifies the scholarship application process on the NSP portal.
Is an Aadhaar Card required for generating OTR?
Yes, an Aadhaar Card is mandatory to generate an OTR. If a student does not have Aadhaar, they can use their EID to generate the OTR but must update Aadhaar details within one month.
What should I do if my Aadhaar seeding fails during the OTR process?
If Aadhaar seeding fails, you will see an NPCI Failed pop-up. You must resolve the issue and retry the seeding process. If it continues to fail, check the Aadhaar details or contact support.
How do I generate the Reference Number for OTR registration?
You can generate the Reference Number via the NSP website or the NSP OTR mobile app by selecting the ‘Register’ option and following the on-screen instructions.
What if I make a mistake in my Aadhaar number during registration?
Providing an incorrect Aadhaar number will cause a mismatch in the system, preventing you from successfully completing the OTR process. Make sure to double-check your Aadhaar details.
Can I generate more than one OTR for the same student?
No, only one OTR ID is allowed per student. Generating multiple OTRs will lead to disqualification from receiving scholarships.